


Solution
The environment necessary for the wireless connection1. Select the wireless setup method
2. Install the Software (Windows)
2. Install the Software (Mac OS X)
The environment necessary for the wireless connection
Before connecting this printer to the network, confirm the following two items, (A) and (B).

(A) Wireless router (supporting IEEE802.11b/g/n)
Your wireless router is the device that connects the network devices in your home (computer, printer, and so on) to the Internet and allows communication between those devices on your home network. A wireless router is necessary for the procedure described here. To use your printer over a wireless connection, your wireless router must already be set up.
(B) The computer to be used with the printer must be connected to the network.
In order to confirm whether the computer to be used with the printer is connected to the network, try to browse the Internet website from the computer.
1. Select the wireless setup method
To use the printer with a wireless connection, you must first connect it to a wireless router.
The correct connection method to use depends on the type of wireless router.
Refer to [ How to connect the printer and router via wireless LAN ] and connect the printer to the wireless router.
When the connection between the printer and the wireless router is complete, refer to [ 2. Install the software ] on this page and install the software.
2. Install the Software (Windows)
Caution
Caution
If the computer is equipped with a CD-ROM drive, you can use CD-ROM for installation.

If the CD-ROM does not autorun:
Double-click [ (My) Computer ] ⋗ CDROM icon ⋗ [ MSETUP4.EXE. ]
Go to Step 5 and follow the instructions.
1. Visit http://canon.com/ijsetup/.
2. Select your region, printer name, and computer OS.
3. In the Product Setup section, click Download. The setup file will be downloaded.

4. Double-click the downloaded .exe file.
The setup will start automatically. Follow the on-screen instructions to complete installation.
5. Click [ Change Connection Method ].

Follow the instruction until the screen below is displayed.
Caution
The setup guide will be displayed and the printer connection method explained, but because the connection between the printer and the wireless router was completed in [ 1. Select the wireless setup method ], the printer operations recommended by the setup guide are unnecessary.
Just select the same connection method as you have done in [ 1. Select the wireless setup method ], and skip the subsequent instructions by clicking Next until you see the screen below.
Caution
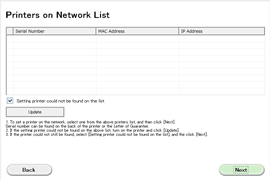
If the printer itself has not been set up, it will not appear in the list of printers on the network.
When you click [ Next ], the setup guide will be displayed. Follow the instructions on the screen to finish setting up the printer.
6. Click [ Next ].

Follow any on-screen instructions to proceed with the software installation.
7. When the Setup Completion dialog box appears, click Complete.

8. Click [ Next ].

9. Click [ Exit ] to complete the installation.

Now the printer connection method is changed from USB to wireless.
2. Install the Software (Mac OS X)
Caution
1. Visit http://canon.com/ijsetup/.
2. Select your region, printer name, and computer OS.
3. In the Product Setup section, click [ Download ]. The setup file will be downloaded.

4. Double-click the downloaded .dmg file.
5. Double-click the [ Setup ] icon.

6. Click [ Next ].

7. In the subsequent screen, enter the administrator name and password. Then click [ Install Helper ].

8. Click [ Change Connection Method ].

Follow the instruction until the screen below is displayed.
Caution
The setup guide will be displayed and the printer connection method explained, but because the connection between the printer and the wireless router was completed in [ 1. Select the wireless setup method ], the printer operations recommended by the setup guide are unnecessary.
Just select the same connection method as you have done in [ 1. Select the wireless setup method ], and skip the subsequent instructions by clicking Next until you see the screen below.
Caution
If the printer itself has not been set up, it will not appear in the list of printers on the network.
When you click [ Next ], the setup guide will be displayed. Follow the instructions on the screen to finish setting up the printer.

9. Click [ Next ].

Follow any on-screen instructions to proceed with the software installation.
10. Click [ Add Printer ].

Caution
- The machine is turned on.
- The firewall function of any security software is turned off.
- The computer is connected to the wireless router.
11. Select Canon xxx series Canon IJ Network and click [ Add ].

Caution
If you will be installing the Canon printer driver on Mac OS X and using the printer through a network connection, you can select [ Bonjour ] or [ Canon IJ Network ] in the [ Add Printer ] dialog.
If [ Bonjour ] is selected, remaining ink level messages may differ from those indicated by [ Canon IJ Network ].
Canon recommends you to use [ Canon IJ Network ] for printing.
12. Click [ Next ].

13. Click [ Next ].

14. Click [ Exit ] to complete the installation.
Remove the Setup CD-ROM and keep it in a safe place.

Now the printer connection method is changed from USB to wireless.