- An Introduction to Shooting 4K Video
-

In this short video tutorial, we explain everything you need to know to set up your camera for 4K video shooting. Whether you’re just starting out in the world of videography or a seasoned creative looking to step up your movie making skills, this is everything you need to get started.
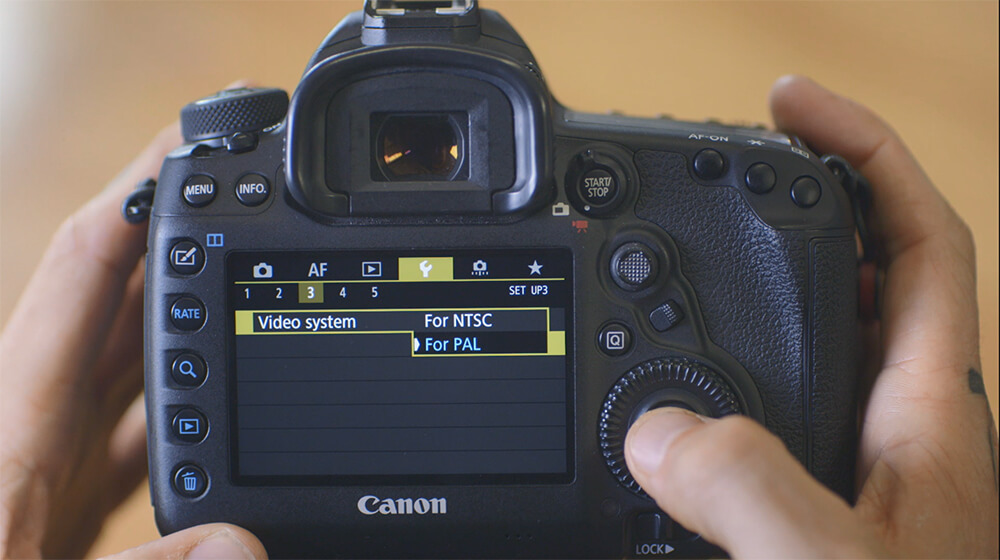
1. Select PAL in Your video System Menu
Navigate your way to the Settings menu and then the third yellow menu. In the Video System drop down you can choose between PAL or NTSC. If you’re in Australia then you’ll want to make sure you are shooting in PAL. This will give you full access to your camera’s range of 4K video shooting features.

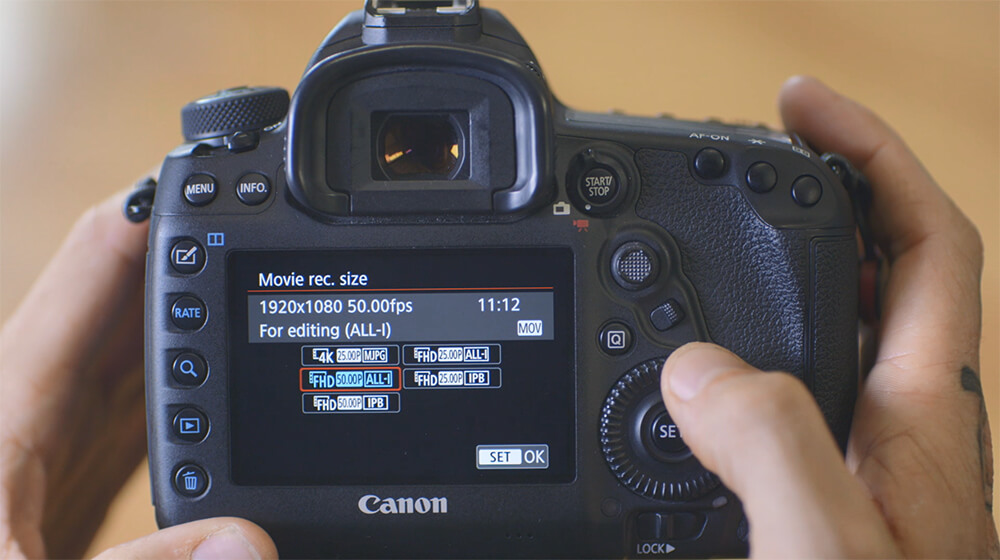
2. Select MOV and 4K in Your Movie Recording Quality Menu
In the fourth red menu, you will find the Movie Recording Quality settings where you can choose between MOV/MP4. Be sure to select MOV then go into the Movie Rec. Size section to choose 4K shooting.
3. Select a Frame Rate
Many Canon cameras offer 4K video shooting at 24 or 25 fps (frames per second), which is the perfect frame rate for getting that filmic look. If however, you would like to slow down your footage in post-production, you will need to shoot your video footage at a frame rate of 50 or 60 fps. On most cameras, these frame rates are only available at FHD quality (full high definition). If you want to shoot 4K video footage at 60fps then consider investing in a pro-level camera model such as the EOS 1D X Mark II.

What Exactly is 4K Video?
Almost all cameras today shoot video at 1080 FHD, which measures in at 1920 pixels displayed horizontally across the screen and 1080 pixels down. 4K video footage is much larger than 1080p footage, coming in at 4096 pixels across the screen and 2160 pixels down. This increased scale results in higher resolution footage.
The Benefits of Shooting in 4K
The best time to shoot video in 4K is when you plan to edit and/or crop your footage during the editing stage. The higher pixel rate and resolution mean you can crop in on your footage without losing quality, which gives you increased creative flexibility. This also comes in handy when stabilising your footage in programs such as Final Cut Pro or Premiere Pro, which automatically crop your video footage in order to eliminate shaky movement.
Finally, because 4K video has such a high resolution, it gives you the advantage of being able to extract 8MP still images from your footage. This can be a fantastic way to get beautiful photos of fast-moving subjects, whether it be at a children’s birthday party or a professional sporting event. If however, you do not plan to edit your footage at a later date, you do not necessarily need to film in 4K.
The Challenge with Shooting in 4K
4K video footage requires significantly more storage space than FHD footage. This means your memory cards will get eaten up at a much quicker rate. You will also need a bigger hard drive to back up your footage, as well as a more powerful computer to process the footage.
Learn more about videography with this tutorial series.

From overcoming failure to adopting the right mindset, Canon Ambassador, Kate Cornish shares her tips on becoming a filmmaker.

R5 C vs R5 vs C70 Video Feature Comparison

Unlock your EOS R5’s true filming power with these videography tips from Harry Pope.