


Issue
Cause and solution
Check 1: Confirm the paper source setting
In this printer, there are two paper sources, a manual feed tray and a rear tray.
You can facilitate printing by selecting a paper source setting that matches your media type or purpose.
The procedure for setting paper source is as follows:
You can also set the paper source on the Quick Setup tab.
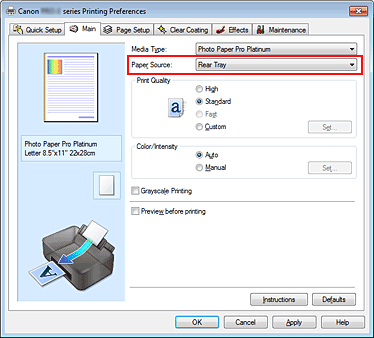
1. Open the printer driver setup window.
2. Select the media type
Select the type of paper loaded in the printer from the Media Type list on the Main tab.
Caution
Cause and solution
3. Select the paper source
From the Paper Source list, select the paper source that matches your purpose.
Manual Feed
Paper is supplied from the manual feed tray in the back.
Caution
Cause and solution
Rear Tray
Paper is fed from the rear tray.
Caution
Cause and solution
4. Complete the setup.
Click OK.
When you execute print, the printer uses the specified paper source to print the data.
Cause and solution
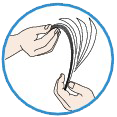
Check 2: Make sure of the following when you load paper
-⋗ [ Loading Paper ]
In the Rear Tray:
In the Manual Feed Tray:
When you load the paper, load one sheet at a time. When you print continuously, set the next paper after the last one is finished printing.
Cause and solution
Check 3: Check to see if the paper you are printing on is not too thick or curled
Do not use the following types of paper. Using such paper will cause not only unsatisfactory results, but also the printer to jam or malfunction.
- Rear Tray: Less than 17 lb / 64 g/m2
- Manual Feed Tray: Less than 4 mil / 0.1 mm
- Rear Tray: More than 28 lb / 105 g/m2 (plain paper except for Canon genuine paper)
* However, you can use non-Canon genuine specialty paper that is up to 53 lb / 200 g/m2.
See [ Non-Canon genuine specialty paper ].
- Manual Feed Tray: More than 23.6 mil / 0.6 mm in thickness or more than 93 lb / 350 g/m2 in weight
Cause and solution
Check 4: Make sure if the paper weight is suitable for use with the printer
Choose paper suitable for printing, for the best print results. Canon provides you various types of paper to enhance the fun of printing, such as stickers as well as papers for photo or document. We recommend the use of Canon genuine paper for printing your important photos.
Media Types
Commercially available papers
- Media type settings -
Printer driver: Plain Paper
- Paper load limit -
Rear Tray: Approx. 150 sheets (14" x 17" / 36 x 43 cm paper cannot be loaded.)
- Paper Output Tray load limit -
Approx. 50 sheets
Caution
Canon genuine papers
Refer to the instruction manual supplied with the paper for detailed information on the printable side and notes on handling paper. For information on the page sizes available for each Canon genuine paper, visit our website.
Caution
For printing photos:
- Media type settings -
Printer driver: Photo Paper Pro Platinum
- Media type settings -
Printer driver: Photo Paper Plus Glossy II
- Media type settings -
Printer driver: Photo Paper Plus Semi-gloss
- Media type settings -
Printer driver: Matte Photo Paper
- Paper load limit -
Rear Tray:
1 sheet for A3+ (13" x 19" / 33 x 48 cm) and 10" x 12" / 25 x 30 cm
10 sheets for A3, A4, Letter (8.5" x 11" / 22 x 28 cm), 5" x 7" / 13 x 18 cm, and 8" x 10" / 20 x 25 cm
20 sheets for 4" x 6" / 10 x 15 cm
(14" x 17" / 36 x 43 cm paper cannot be loaded.)
Manual Feed Tray:
1 sheet (4" x 6" / 10 x 15 cm paper and 5" x 7" / 13 x 18 cm paper cannot be loaded.*1)
- Paper Output Tray load limit -
We recommend that you remove the previously printed sheet from the Paper Output Tray before continuously printing to avoid blurs and discoloration.
*1 Feeding this size of paper from the Manual Feed Tray can damage the printer. Always load in the Rear Tray.
Caution
- Media type settings -
Printer driver: Fine Art "Photo Rag"
- Paper load limit -
Rear Tray: 1 sheet
Manual Feed Tray: 1 sheet
- Media type settings -
Printer driver: Fine Art "Museum Etching"
- Paper load limit -
Manual Feed Tray: 1 sheet
- Paper Output Tray load limit -
We recommend that you remove the previously printed sheet from the Paper Output Tray before continuously printing to avoid blurs and discoloration.
*2 Feeding this paper from the Rear Tray can damage the printer. Always load in the Manual Feed Tray.
Caution
For creating your own prints:
- Media type settings -
Printer driver: Photo Paper Plus Glossy II
- Paper load limit -
Rear Tray: 1 sheet
- Paper Output Tray load limit -
We recommend that you remove the previously printed sheet from the Paper Output Tray before continuously printing to avoid blurs and discoloration.
Caution
Non-Canon genuine specialty paper
Caution
- Media type settings -
Printer driver: Other Fine Art Paper 1*1 *2 or Other Fine Art Paper 2*1 *2
- Paper source -
Rear Tray: 1 sheet*3
Manual Feed Tray: 1 sheet
- Media type settings -
Printer driver: Other Glossy Paper (Margin 35)*1 *2 or Other Glossy Paper
- Paper source -
Rear Tray: 1 sheet*3
Manual Feed Tray: 1 sheet
*1 You cannot print in the 1.38 inches / 35 mm margin on the top and bottom edges according to the direction of printing.
Select Art A4 (Margin 35), Art Letter (Margin 35), Art A3 (Margin 35), or Art A3+ (Margin 35) in Printer Paper Size according to the size you are using.
For details on the printable area, refer to [ Printing Area ].
*2 Full-page borderless printing is not available.
*3 You can use paper that is up to 53 lb / 200 g/m2.
Page Sizes
You can use the following page sizes.
Caution
Standard sizes:
Non-standard sizes:
You can also specify a custom size within the following range.
3.50 x 5.00 inches / 89.0 x 127.0 mm (Rear Tray)
8.00 x 10.00 inches / 203.2 x 254.0 mm (Manual Feed Tray)
12.95 x 26.61 inches / 329.0 x 676.0 mm (Rear Tray)
14.00 x 23.00 inches / 355.6 x 584.2 mm (Manual Feed Tray)
Paper Weight / Thickness
Rear Tray:
From 17 lb / 64 g/m2 to 28 lb / 105 g/m2 (plain paper except for Canon genuine paper)
Do not use heavier or lighter paper (except for Canon genuine paper), as it could jam in the printer.
However, you can use non-Canon genuine specialty paper that is up to 53 lb / 200 g/m2.
Refer to [ Non-Canon genuine specialty paper ] within this webpage.
Manual Feed Tray:
From 4 mil / 0.1 mm to 23.6 mil / 0.6 mm (up to 93 lb / 350 g/m2)
Do not use paper thicker or heavier than this, as it could jam in the printer.
Notes on Paper for Full-page Borderless Printing
* For information on the non-Canon genuine specialty paper for full-page borderless printing, Refer to [ Non-Canon genuine specialty paper ] within this webpage.
Cause and solution
Check 5: Make sure that there are not any foreign objects in the Rear Tray or Manual Feed Tray

If the paper tears in the Rear Tray or the Manual Feed Tray, see [ Paper Jams ] to remove it.
If there are any foreign objects in the Rear Tray or Manual Feed Tray, be sure to turn off the printer, unplug it from the power supply, then remove the foreign object.
Caution
Cause and solution
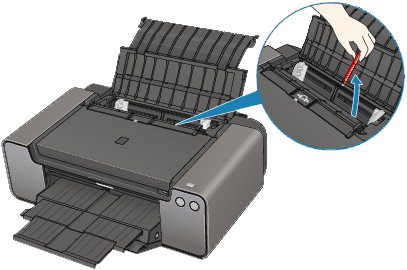
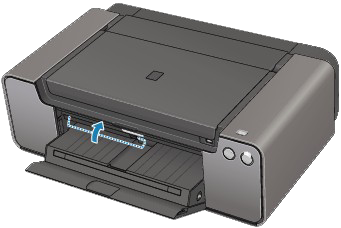
Check 6: Make sure that the Inner Cover is closed completely
Paper does not feed properly if the Inner Cover is even slightly open.
Caution
Cautions When Printing on the Disc Label
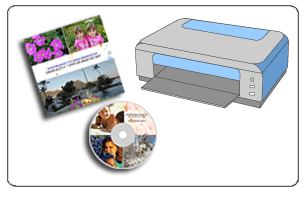
Items to Prepare
The following items are needed to print onto the printable disc:
"H" is on the upper side.
Needed only when printing on 3.15 inches / 8 cm printable discs.
Attached to the Disc Tray when shipped.
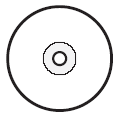
Obtain a 4.72 inches / 12 cm or 3.15 inches / 8 cm printable disc with a label surface compatible with inkjet printing.
A "printable disc" differs from regular BD/DVD/CDs in that its label surface has been specially processed to be printed on by an inkjet printer.
Attaching the Disc Tray
Caution
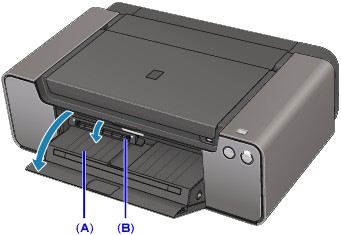
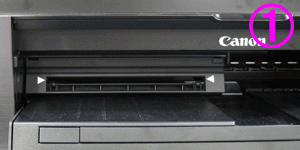
1. Open the Paper Output Tray (A) slowly.
2. Open the Inner Cover (B).
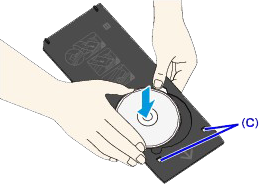
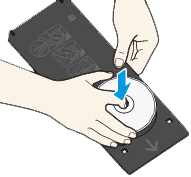
3. Place the printable disc on the Disc Tray.
Caution
(1) Place the printable disc on the Disc Tray with the printable surface facing up.
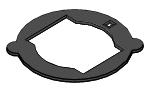
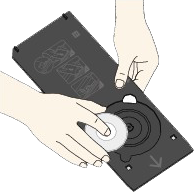
(1) Align the protrusions on both edges of the 3.15 inches / 8 cm Disc Adapter with indentations on the Disc Tray.
(2) Place the 3.15 inches / 8 cm printable disc on the Disc Tray with the printing surface facing up.

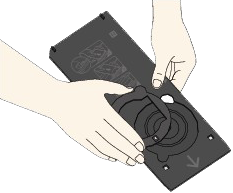
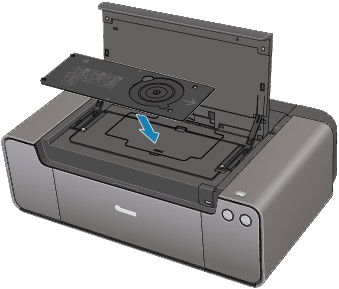
4. Attach the Disc Tray to the printer.
Caution
Caution
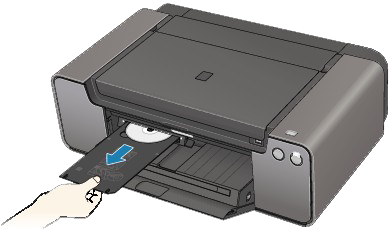
5. Insert the Disc Tray straight until the arrow ( 

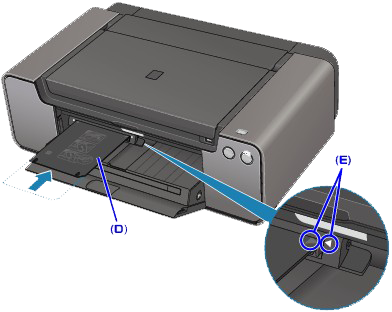
(D) Keep the Disc Tray level when inserting it.
(E) Align the arrow (
Caution
) on the Inner Cover.Removing the Disc Tray
1. Pull out the Disc Tray.
2. Close the Inner Cover.
Caution
3. Remove the printable disc from the Disc Tray.
Caution
Caution
(1) Remove the printable disc from the Disc Tray.
(1) Remove the 3.15 inches / 8 cm Disc Adapter from the Disc Tray.

(2) Remove the 3.15 inches / 8 cm printable disc from the Disc Tray.
- Storing the Disc Tray
When you do not use the Disc Tray, keep it in the Disc Tray Storage Compartment located under the Top Cover.
Caution
Printing Disc Labels and Case Covers
You can print your own disc labels and case covers using your favorite photos.
Caution
Do not set the disc tray until a message prompting you to load a printable disc appears. Loading a printable disc while the machine is operating may damage the machine.
Steps
1. Start Easy-PhotoPrint EX.
2. Click Disc Label/Case Cover from Menu.
The Page Setup screen appears.
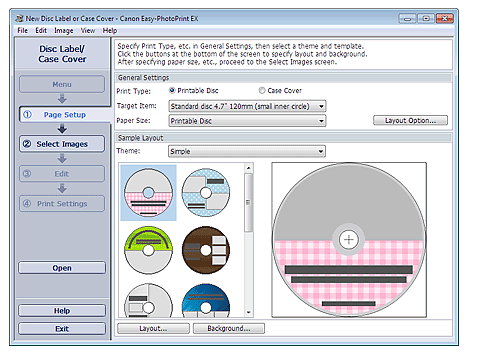
3. Set Print Type, Target Item or Paper Size, etc. in the General Settings section.
Caution
4. Select the theme and the layout you want to use from Theme in Sample Layout.
5. If you want to change the layout, click Layout....
The Change Layout dialog box appears.
Caution
The layouts that can be selected may vary depending on the Print Type or Target Item.
6. If you want to change the background, click Background....
The Change Background dialog box appears.
In the Change Background dialog box, you can paint the background in a single color or paste an image file to it.
7. Click Select Images in the step button area on the left side of the screen.
The Select Images screen appears.
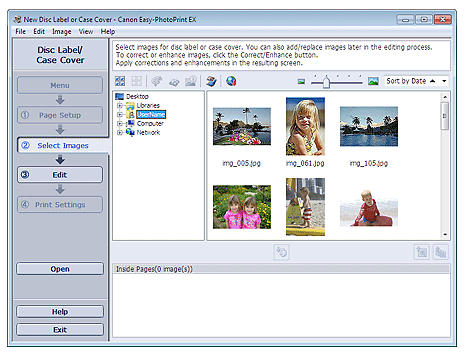
8. Select the folder that contains the image you want to print from the Folder Tree area.
The images in the folder will be displayed as thumbnails (miniatures).
Caution
If Easy-PhotoPrint EX is started from another application (MP Navigator EX), the Folder Tree area will not be displayed.
The images selected in MP Navigator EX will be displayed as thumbnails.
Caution
9. Select the image(s) you want to print, and click 
The selected image(s) is (are) displayed in the selected image area.
You can also select the image(s) you want to print by dragging it (them) into the selected image area.
Caution
To delete an image in the selected image area, select the image you want to delete and click 
To delete all images from the selected image area, click 
10. Click Edit in the step button area on the left side of the screen.
The Edit screen appears.
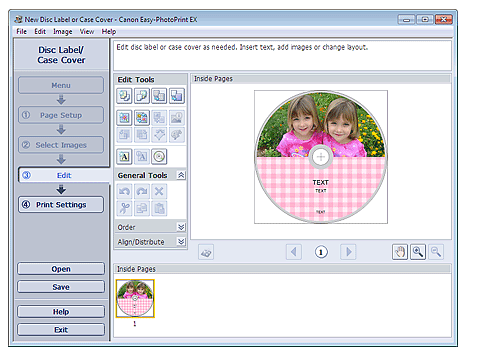
11. Edit your disc label/case cover if necessary.
Caution
The edit information will be discarded if you exit Easy-PhotoPrint EX without saving the edited disc label/case cover. It is recommended that you save the item if you want to edit it again.
Caution
When Printable Disc is selected for Print Type in the Page Setup screen, 
12.Click Print Settings in the step button area on the left side of the screen.
The Print Settings screen appears.
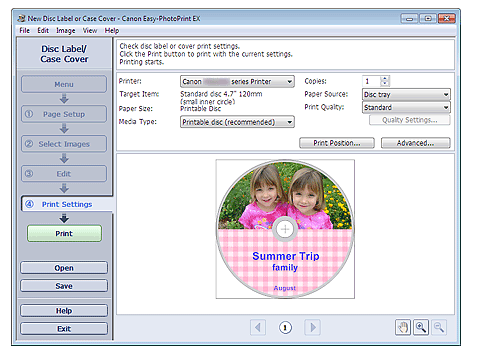
13. Set Media Type, Paper Source, etc. according to the printer and paper to be used.
Caution
14. Click Print in the step button area on the left side of the screen.
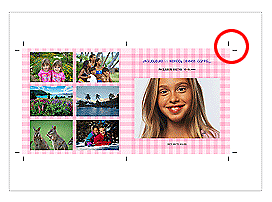
Caution
Crop marks may not be printed depending on the selected target item and paper size.
Printing Labels on Discs Directly
You can print labels on printable discs.
If you want to edit the details, return to Menu and select Disc Label/Case Cover. Refer to [ Printing Disc Labels and Case Covers ] within this webpage, for details.
Caution
Do not set the disc tray until a message prompting you to load a printable disc appears. Loading a printable disc while the machine is operating may damage the machine.
1. Make sure that the machine is turned on.
2. Start Easy-PhotoPrint EX.
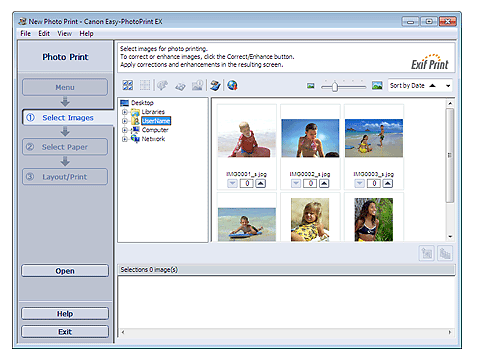
3. Click Photo Print from Menu.
The Select Images screen appears.
Caution
The thumbnails (reduced images) displayed in the screen may appear as follows:
- A black line appears along an edge of the image.
- An edge of the image appears cropped.
However, such images will be displayed normally when enlarged or previewed, and print results will not be affected.
4. Select the folder that contains the image you want to print from the Folder Tree area.
The images in the folder will be displayed as thumbnails (miniatures).
Caution
If Easy-PhotoPrint EX is started from another application (MP Navigator EX, ZoomBrowser EX or Digital Photo Professional), the Folder Tree area will not be displayed.
The images selected in the application will be displayed as thumbnails.
Caution
5. Click the image you want to print.
The number of copies appears as "1" below the clicked image, while the selected image itself will appear in the selected image area.
Caution
 (Delete Imported Image).
To delete all images from the selected image area, click 
 (Up arrow) until the number of copies you want is reached. To reduce the number of copies shown in the box, click
  (Down arrow).
6. Click Select Paper in the step button area on the left side of the screen.
The Select Paper screen appears.
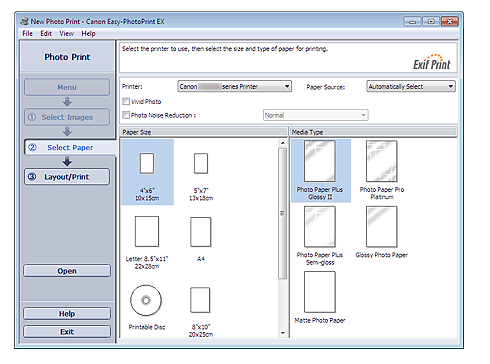
7. Set the Printer in the Select Paper screen.
8. Select Printable Disc for Paper Size.
Set the Media Type according to the printable disc to be used.
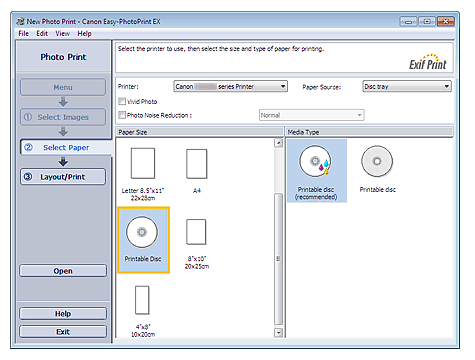
Caution
When Printable Disc is selected for Paper Size, only Disc tray will be selectable for Paper Source.
9. Click Layout/Print.
The Layout/Print screen appears.
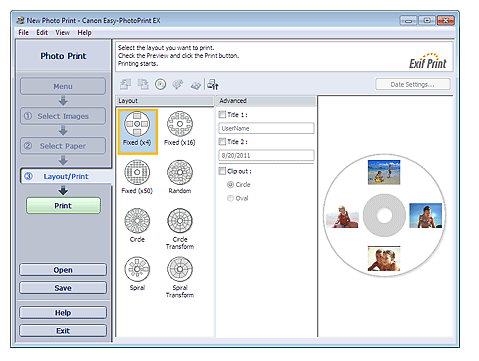
10. Select a layout you want to use.
11. Enter the title(s) and specify the details of the layout in Advanced.
Caution
Items that can be set may vary depending on the selected layout.
12. Click Print.
Follow the message to load a printable disc, then start printing.
Printing starts from the top of the image displayed in Preview.
Caution
 (Adjust Print Area/Print Position).
 (Settings) or select Preferences... from the File menu.
Cause and solution
Check 7: Clean the Paper Feed Roller
Caution
If the Paper Feed Roller is dirty or paper powder is attached to it, paper may not be fed properly.
In this case, clean the Paper Feed Roller. Cleaning will wear out the Paper Feed Roller, so perform this only when necessary.
You need to prepare: three sheets of A4 or Letter-sized plain paper
Windows
1. Make sure that the power is turned on.
2. Open the Paper Output Tray gently, and pull out the Output Tray Extension.
Caution
* The Inner Cover is not present depending on the country or region of purchase.
3. Open the printer driver setup window.
4. Select Roller Cleaning.
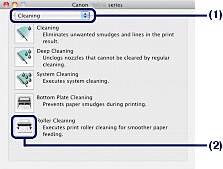
(1) Click the Maintenance tab.
(2) Click Roller Cleaning.
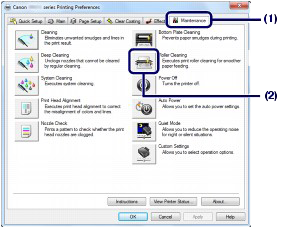
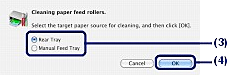
(3) Select the paper source to clean (Rear Tray or Manual Feed Tray).
(4) Click OK.
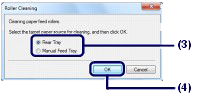
If you selected Manual Feed Tray in (3), go to step 6.
5. Clean the Paper Feed Roller without paper.
(1) Follow the message to remove paper in the Rear Tray.
(2) Click OK.
The Paper Feed Roller will rotate as it is cleaned.
6. Clean the Paper Feed Roller with paper.
- When Rear Tray is selected in (3) of step 4:
(1) Make sure that the Paper Feed Roller has stopped rotating, then follow the message to load three sheets of A4 or Letter-sized plain paper in the Rear Tray.
(2) Click OK.
The printer starts cleaning.
The cleaning will be completed after the paper is ejected.
Do not perform any other operations until the printer completes the cleaning of the Paper Feed Roller.
(3) When the completion message appears, click OK.
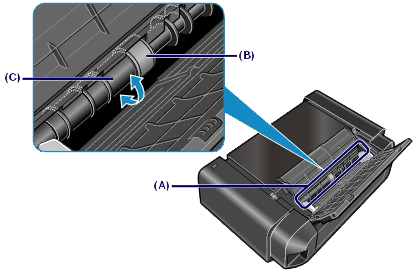
If the problem is not resolved after cleaning the Paper Feed Roller in the Rear Tray, turn off the power, disconnect the power plug, then wipe the Paper Feed Roller parts (the large Paper Feed Roller in the center and three rollers on each side of it) (A) located in the Rear Tray with a moistened cotton swab or the like. Do not touch the Paper Feed Roller (B) with your fingers. Wipe the Paper Feed Roller parts with a cotton swab while turning the shaft (C) with your fingers.
After cleaning the Paper Feed Roller parts with a cotton swab, turn on the power and repeat the procedure from step 1 to clean the Paper Feed Roller.
If the problem is not resolved after cleaning the Paper Feed Roller as described above, contact the service center.
- When Manual Feed Tray is selected in (3) of step 4:
(1) Confirm the message and click OK.
(2) Follow the message to load a sheet of A4 or Letter-sized plain paper in the Manual Feed Tray.
(3) Click OK.
The printer starts cleaning.
Do not perform any other operations during the cleaning of the Paper Feed Roller.
(4) Repeat the procedures of (2) and (3) two more times.
The cleaning will be completed after being performed three times.
(5) When the completion message appears, click OK.
If the problem is not resolved after cleaning the Paper Feed Roller as described above, contact the service center.
Macintosh
1. Make sure that the power is turned on.
2. Open the Paper Output Tray gently, and pull out the Output Tray Extension.
Caution
* The Inner Cover is not present depending on the country or region of purchase.
3. Open the Canon IJ Printer Utility.
4. Select Roller Cleaning.
(1) Make sure that Cleaning is selected in the pop-up menu.
(2) Click Roller Cleaning.
(3) Select the paper source to clean (Rear Tray or Manual Feed Tray).
(4) Click OK.
If you selected Manual Feed Tray in (3), go to step 6.
5. Clean the Paper Feed Roller without paper.
(1) Follow the message to remove paper in the Rear Tray.
(2) Click OK.
The Paper Feed Roller will rotate as it is cleaned.
6. Clean the Paper Feed Roller with paper.
- When Rear Tray is selected in (3) of step 4:
(1) Make sure that the Paper Feed Roller has stopped rotating, then follow the message to load three sheets of A4 or Letter-sized plain paper in the Rear Tray.
(2) Click OK.
The printer starts cleaning.
The cleaning will be completed after the paper is ejected.
Do not perform any other operations until the printer completes the cleaning of the Paper Feed Roller.
If the problem is not resolved after cleaning the Paper Feed Roller in the Rear Tray, turn off the power, disconnect the power plug, then wipe the Paper Feed Roller parts (the large Paper Feed Roller in the center and three rollers on each side of it) (A) located in the Rear Tray with a moistened cotton swab or the like. Do not touch the Paper Feed Roller (B) with your fingers. Wipe the Paper Feed Roller parts with a cotton swab while turning the shaft (C) with your fingers.
After cleaning the Paper Feed Roller parts with a cotton swab, turn on the power and repeat the procedure from step 1 to clean the Paper Feed Roller.
If the problem is not resolved after cleaning the Paper Feed Roller as described above, contact the service center.
- When Manual Feed Tray is selected in (3) of step 4:
(1) Confirm the message and click OK.
(2) Follow the message to load a sheet of A4 or Letter-sized plain paper in the Manual Feed Tray.
(3) Click OK.
The printer starts cleaning.
Do not perform any other operations during the cleaning of the Paper Feed Roller.
(4) Repeat the procedures of (2) and (3) two more times.
The cleaning will be completed after being performed three times.
If the problem is not resolved after cleaning the Paper Feed Roller as described above, contact the service center.