


Issue
When a printer error occurs, the Alarm lamp flashes orange as shown below. The number of flashes indicates the type of error that has occurred. Count the flashes and take the appropriate action to correct the error.

Caution
ON Lamp Flashes and Alarm Lamp Flashes Orange Alternately
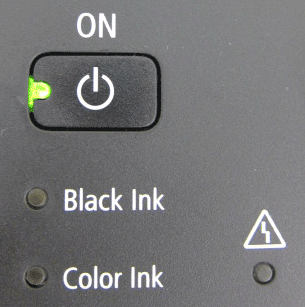
If the ON lamp flashes and the Alarm lamp flashes orange alternately, it may be possible that an error requiring you to contact the service center has occurred.
Cause and solution
Support Code=1000 Two flashes: Machine is out of paper./Paper does not feed
Reload the paper on the rear tray and press the Black or Color button.
Cause and solution
Support Code=1300 Three flashes: Paper jam
The paper may be jammed. Remove the jammed paper, reload paper properly in the machine, then press the Black or Color button.
Cause and solution
Support Code=1687 Four flashes: The FINE cartridge is not installed properly
The FINE cartridge is not installed properly.
Open the scanning unit / cover and install the appropriate FINE cartridge. After that, push the ink cartridge locking cover until it clicks into place, then close the scanning unit / cover.
-⋗ [ Replacing FINE Cartridges ]
If the error is not resolved, remove the FINE cartridges, then install them again.
Cause and solution
Support Code=1401,1403,1485 Five flashes: The FINE Cartridge is not installed properly./Appropriate FINE Cartridge is not installed
Install the FINE Cartridge.
Printing cannot be executed because the ink cartridge is not compatible with this machine.
Install the appropriate ink cartridge.
If you want to cancel printing, press the machine's Stop/Reset button.
If the error is not resolved, contact the service center.
Cause and solution
Support Code=1486,1487 Seven flashes: FINE cartridge is not installed in the correct position
Make sure that each FINE cartridge is installed in the correct position.
When you need to replace a FINE cartridge, follow the procedure below.
Caution
Handling FINE Cartridges

Caution
Both color ink and black ink are also consumed in the standard cleaning and deep cleaning of the print head, which may be necessary to maintain the performance of the machine. When ink runs out, replace the FINE cartridge immediately with a new one.
1. Make sure that the power is turned on.
2. Open the paper support.
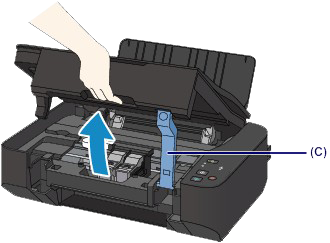
3. Lift the scanning unit / cover, then hold it open with the scanning unit support (C).
The FINE cartridge holder moves to the replacement position.
Caution
Caution
For details on the cleaning, refer to Safety and Important Information.
4. Remove the empty FINE Cartridge.

(1) Pinch the tabs and open the ink cartridge locking cover.
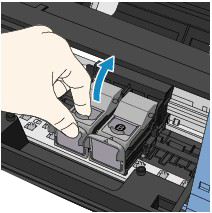
(2) Remove the FINE cartridge.
Caution
5. Prepare a new FINE cartridge.
(1) Take a new FINE cartridge out of its package and remove the protective tape (D) gently.
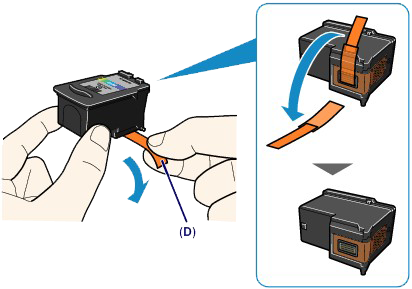
Caution
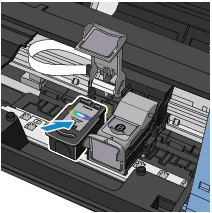
6. Install the FINE Cartridge.

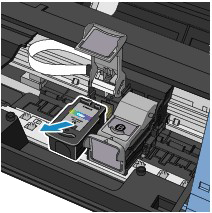
(1) Put the new FINE cartridge on the FINE cartridge holder.
The color FINE cartridge should be installed into the left slot and the black FINE cartridge should be installed into the right slot.
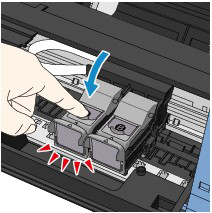
(2) Close the ink cartridge locking cover to lock the FINE cartridge into place.
Push down the ink cartridge locking cover until it clicks.
(3) Confirm that the ink cartridge locking cover is closed correctly.
Caution
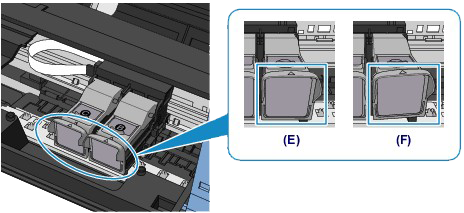
(E) Closed correctly
(F) Not closed correctly (the cover is tilted)
Caution
7. Lift the scanning unit / cover slightly to set the scanning unit support back to its original position, and gently close the scanning unit / cover.
Caution
Caution
-⋗ [ Alarm Lamp Flashes Orange ]
Cause and solution
Support Code=1700 Eight flashes: Ink absorber is almost full.
The ink absorber is almost full.
The machine has a built-in ink absorber to hold the ink used during Print Head Cleaning.
Press the machine's Black or Color button to continue printing. Contact the service center.
Cause and solution
Support Code=1686 Thirteen flashes: The remaining ink level cannot be detected
The ink may have run out.
The function for detecting the remaining ink level will be disabled since the ink level cannot be correctly detected.
If you want to continue printing without this function, press the machine's Stop/Reset button for at least 5 seconds.
Canon recommends to use new genuine Canon cartridges in order to obtain optimum qualities.
-⋗ [ Replacing FINE Cartridges ]
Please be advised that Canon shall not be liable for any malfunction or trouble caused by continuation of printing under the ink out condition.
Cause and solution
Support Code=1684 Fourteen flashes: The FINE cartridge cannot be recognized
The ink cartridge cannot be recognized.
Printing cannot be executed because the ink cartridge may not be installed properly or may not be compatible with this machine.
Install the appropriate ink cartridge.
If you want to cancel printing, press the machine's Stop/Reset button.
When you need to replace a FINE cartridge, follow the procedure below.
Caution
Handling FINE Cartridges
Caution
Both color ink and black ink are also consumed in the standard cleaning and deep cleaning of the print head, which may be necessary to maintain the performance of the machine. When ink runs out, replace the FINE cartridge immediately with a new one.
1. Make sure that the power is turned on.
2. Open the paper support.
3. Lift the scanning unit / cover, then hold it open with the scanning unit support (C).
The FINE cartridge holder moves to the replacement position.
Caution
Caution
For details on the cleaning, refer to Safety and Important Information.
4. Remove the empty FINE Cartridge.
(1) Pinch the tabs and open the ink cartridge locking cover.
(2) Remove the FINE cartridge.
Caution
5. Prepare a new FINE cartridge.
(1) Take a new FINE cartridge out of its package and remove the protective tape (D) gently.
Caution
6. Install the FINE Cartridge.
(1) Put the new FINE cartridge on the FINE cartridge holder.
The color FINE cartridge should be installed into the left slot and the black FINE cartridge should be installed into the right slot.
(2) Close the ink cartridge locking cover to lock the FINE cartridge into place.
Push down the ink cartridge locking cover until it clicks.
(3) Confirm that the ink cartridge locking cover is closed correctly.
Caution
(E) Closed correctly
(F) Not closed correctly (the cover is tilted)
Caution
7. Lift the scanning unit / cover slightly to set the scanning unit support back to its original position, and gently close the scanning unit / cover.
Caution
Caution
-⋗ [ Alarm Lamp Flashes Orange ]
Cause and solution
Support Code=1682 Fifteen flashes: The FINE cartridge cannot be recognized
The FINE cartridge cannot be recognized.
Replace the FINE cartridge.
-⋗ [ Replacing FINE Cartridges ]
If the error is not resolved, the FINE cartridge may be damaged. Contact the service center.
Cause and solution
Support Code=1688 Sixteen flashes: The ink has run out
The ink has run out.
Replace the ink cartridge and close the scanning unit / cover.
-⋗ [ Replacing FINE Cartridges ]
If printing is in progress and you want to continue printing, press the machine's Stop/Reset button for at least 5 seconds with the ink cartridge installed. Then printing can continue under the ink out condition.
The function for detecting the remaining ink level will be disabled.
Replace the empty ink cartridge immediately after the printing. The resulting print quality is not satisfactory, if printing is continued under the ink out condition.
Cause and solution
Support Code=5100 Two flashes:
Cancel printing, turn off the machine. Then clear the jammed paper or protective material that is preventing the FINE cartridge holder from moving, and turn on the machine again.
Caution
Cause and solution
Support Code=B200 Ten flashes:
Turn off the machine, and unplug the power cord of the machine from the power supply.
Contact the service center.
Cause and solution
Support Code=5011,5012,5200,5400,5700,6000,6800,6801,5B00,6930,6931,6932,6933,6936,6937,6938,6940,6941,6942,6943,6944,6945.6946 Other cases than above:
Turn off the machine, and unplug the power cord of the machine from the power supply.
Plug the machine back in and turn the machine back on.
If the problem is not resolved, contact the service center.