


Issue
- Devices Required for Wired Connection
When using the printer over a wired connection, a commercial network device (router, etc.) and Ethernet cable are required.

(A) Router, etc.
(B) Ethernet cable
Cause and solution
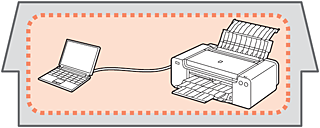
USB Connection
This is recommended when you use the printer on only one computer.
About this page
This page is for the PRO-1 with firmware version 2.000 or later.
Check your PRO-1 firmware version while referring to [ How to upgrade the firmware ], and upgrade the firmware if necessary before going through this page.
With the upgraded firmware, you can perform the following:
- Printing in the color hue (in the PRO Mode) that looks like the one on the monitor
- Reducing the Fine Art Paper margin (from 35 mm to 30 mm)
- Printing on Canvas paper
Caution
The latest version of the printer driver needs to be installed.
With Mac OS X v10.4, the above new features are not available.
Windows
Caution
1. Download the printer driver from the download library.
2. Double-click the downloaded .exe file.
3. Follow the instructions on the screen to install the driver.
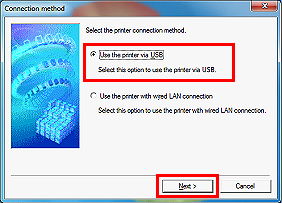
4. In the [Connection method] window, select [Use the printer via USB] and click [Next].
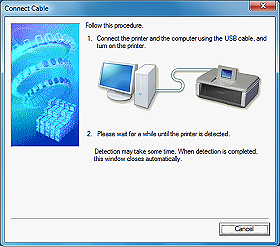
5. When you see the [Connect Cable] window, connect the printer to the PC using a USB cable.
Then, power on the printer.
6. In the [Installation Complete] window, click [Complete].
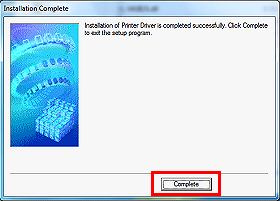
This concludes the setup via USB connection.
Mac OS X
Caution
1. Download the printer driver from the download library.
2. Double-click the downloaded .dmg file to extract it.
3. Double-click the [pkg] file.
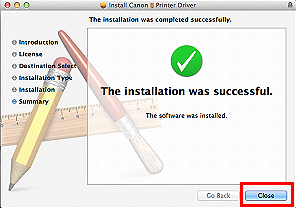
4. Follow the instructions on the screen to install the driver.
5. Click [Close] to complete the installation.
6. Connect the printer to the PC using a USB cable.
Then, power on the printer.
Caution
In System Preferences, click [Print & Scan] and confirm that "PRO-1 v1-1 series" is added.
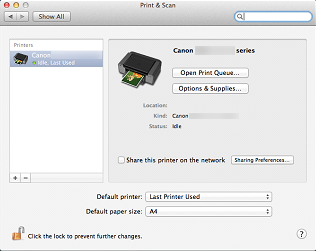
This concludes the setup via USB connection.
Cause and solution
Wired LAN Connection
This is recommended when using the printer on a computer connected to a network.

About this page
This page is for the PRO-1 with firmware version 2.000 or later.
Check your PRO-1 firmware version while referring to [ How to upgrade the firmware ], and upgrade the firmware if necessary before going through this page.
With the upgraded firmware, you can perform the following:
- Printing in the color hue (in the PRO Mode) that looks like the one on the monitor
- Reducing the Fine Art Paper margin (from 35 mm to 30 mm)
- Printing on Canvas paper
Caution
The latest version of the printer driver needs to be installed.
With Mac OS X v10.4, the above new features are not available.
Wired Setup
Before Configuring Wired Settings
Caution
Make sure that the computer and router are connected.

After confirming the connection, perform the following instructions to add (connect) the machine to the network.

A: Internet
B: Router, etc.
Caution
Confirm that the printer is powered on.
When the printer is turned on, the Power lamp (A) turns on.

1. On the back right of the printer, detach the cap (A) from the lower connector.

2. Using a LAN cable (B), connect the printer to the network device such as a router.

Caution
The LAN cable must be connected to the lower connector, not the upper one (USB port).
Now, the LAN cable is properly connected.
Install the Software
Let’s perform the software installation.
Caution
1. Download the printer driver from the download library.
2. Double-click the downloaded .exe file.
3. Follow the instructions on the screen to install the driver.
4. In the [Connection method] window, select [Use the printer with wired LAN connection] and click [Next].

5. In the [Check Wired LAN Connection] window, click [OK].

6. In the [Detected Printers List] window, select [Canon PRO-1 v1-1 series] and click [Next].

7. In the [Setup Completion] window, click [Complete].

This concludes the wired LAN setup.
About this page
This page is for the PRO-1 with firmware version 2.000 or later.
Check your PRO-1 firmware version while referring to [ How to upgrade the firmware ], and upgrade the firmware if necessary before going through this page.
With the upgraded firmware, you can perform the following:
- Printing in the color hue (in the PRO Mode) that looks like the one on the monitor
- Reducing the Fine Art Paper margin (from 35 mm to 30 mm)
- Printing on Canvas paper
Caution
The latest version of the printer driver needs to be installed.
With Mac OS X v10.4, the above new features are not available.
Wired Setup
Before Configuring Wired Settings
Caution
Make sure that the computer and router are connected.
After confirming the connection, perform the following instructions to add (connect) the machine to the network.
A: Internet
B: Router, etc.
Caution
Confirm that the printer is powered on.
When the printer is turned on, the Power lamp (A) turns on.
1. On the back right of the printer, detach the cap (A) from the lower connector.
2. Using a LAN cable (B), connect the printer to the network device such as a router.
Caution
The LAN cable must be connected to the lower connector, not the upper one (USB port).
Now, the LAN cable is properly connected.
Install the Software
Let’s perform the software installation.
Caution
Quit all applications before installation.
1. Download the printer driver from the download library.
2. Double-click the downloaded .dmg file to extract it.
3. Double-click the [pkg] file.
4. Follow the instructions on the screen to install the driver.
5. Click [Close] to complete the installation.

6. In System Preferences, click [Print & Scan] and click [+].

7. Select [Add Printer or Scanner...].

8. Wait for a while, then select [Canon PRO-1 v1-1 series] and click [Add].

When selecting [Canon PRO-1 v1-1 series], select the one with [Canon IJ Network] in the Kind column.
9. Confirm that [Canon PRO-1 v1-1 series] is added to the printer list.
This concludes the wired LAN setup.
Cause and solution
Setup Additional Computers
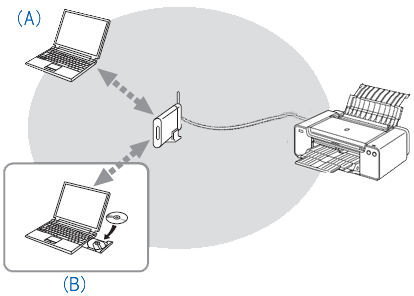
This is recommended when using the printer on a computer connected to a network.
Perform only the software installation on the computer you want to use.
(A) Computer from which the printer can be used currently
(B) Additional computers on the same network
It enables the computer to use the printer.
About this page
This page is for the PRO-1 with firmware version 2.000 or later.
Check your PRO-1 firmware version while referring to [ How to upgrade the firmware ], and upgrade the firmware if necessary before going through this page.
With the upgraded firmware, you can perform the following:
- Printing in the color hue (in the PRO Mode) that looks like the one on the monitor
- Reducing the Fine Art Paper margin (from 35 mm to 30 mm)
- Printing on Canvas paper
Caution
The latest version of the printer driver needs to be installed.
With Mac OS X v10.4, the above new features are not available.
Use from Additional Computers
When you add or upgrade to a new computer, follow the instructions below in order to use this printer with the new computer:
Caution
In order to use this printer with the computer (B),
1. Insert the Setup CD-ROM into the computer from which you want to use the machine.
2. Follow the on-screen instructions to install the software.
Other settings are not required.

A: Computer from which the machine can be used currently
B: Additional computers on the same network
It enables the computer to use the machine.
Caution
Install the Software
Let’s perform the software installation.
Caution
1. Download the printer driver from the download library.
2. Double-click the downloaded .exe file.
3. Follow the instructions on the screen to install the driver.
4. In the [Connection method] window, select [Use the printer with wired LAN connection] and click [Next].
5. In the [Check Wired LAN Connection] window, click [OK].
6. In the [Detected Printers List] window, select [Canon PRO-1 v1-1 series] and click [Next].
7. In the [Setup Completion] window, click [Complete].
This concludes the wired LAN setup.
About this page
This page is for the PRO-1 with firmware version 2.000 or later.
Check your PRO-1 firmware version while referring to [ How to upgrade the firmware ], and upgrade the firmware if necessary before going through this page.
With the upgraded firmware, you can perform the following:
- Printing in the color hue (in the PRO Mode) that looks like the one on the monitor
- Reducing the Fine Art Paper margin (from 35 mm to 30 mm)
- Printing on Canvas paper
Caution
The latest version of the printer driver needs to be installed.
With Mac OS X v10.4, the above new features are not available.
Use from Additional Computers
When you add or upgrade to a new computer, follow the instructions below in order to use this printer with the new computer:
Caution
In order to use this printer with the computer (B),
1. Insert the Setup CD-ROM into the computer from which you want to use the machine.
2. Follow the on-screen instructions to install the software.
Other settings are not required.
A: Computer from which the machine can be used currently
B: Additional computers on the same network
It enables the computer to use the machine.
Caution
Install the Software
Let’s perform the software installation.
Caution
Quit all applications before installation.
1. Download the printer driver from the download library.
2. Double-click the downloaded .dmg file to extract it.
3. Double-click the [pkg] file.
4. Follow the instructions on the screen to install the driver.
5. Click [Close] to complete the installation.
6. In System Preferences, click [Print & Scan] and click [+].
7. Select [Add Printer or Scanner...].
8. Wait for a while, then select [Canon PRO-1 v1-1 series] and click [Add].
When selecting [Canon PRO-1 v1-1 series], select the one with [Canon IJ Network] in the Kind column.
9. Confirm that [Canon PRO-1 v1-1 series] is added to the printer list.
This concludes the wired LAN setup.