

Solution
The self-timer is useful when you want to photograph yourself or prevent camera shake caused when the shutter is released.
1. Set the power to ⋖ON⋗.
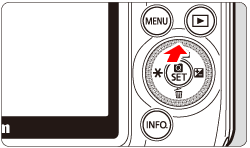
2. Press ⋖

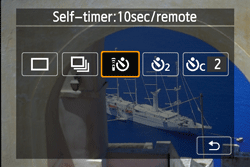
3. Tap the self-timer.


4. Focus the subject, then press the shutter button completely.
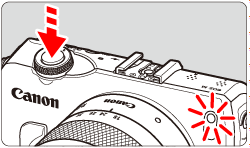
You can check the self-timer operation with the self-timer/AF-assist beam, beeper, and countdown display (in seconds) on the LCD monitor.
Two seconds before the picture is taken, the self-timer/AF-assist beam will light up and the beeper will sound faster.
To cancel the self-timer shooting:
Press the ⋖
(To cancel the self-timer setting, press the ⋖
Caution
With [ ], the interval between the multiple shots may be prolonged depending on the shooting functions settings such as the imagerecording quality or flash.
], the interval between the multiple shots may be prolonged depending on the shooting functions settings such as the imagerecording quality or flash.When you use a Creative Filter and shoot, even if you set the drive mode
to [ ] (Self-timer: Continuous), single shooting will take effect.
] (Self-timer: Continuous), single shooting will take effect.Caution
After taking self-timer shots, playing back the image to check focus and exposure is recommended.
When using the self-timer to shoot only yourself, use focus lock on an object at about the same distance as where you will stand.