Introduction
As you check the shooting screen on your smartphone, you can use it to shoot remotely.
You can also shoot, view, or geotag images by using your smartphone as a remote control.
⋖Controlling the Camera via Bluetooth⋗
You can use a Bluetooth enabled smartphone for remote shooting and switching of image display.
This is convenient if you want to connect quickly while shooting, or if you will control playback while connected to a TV.
⋖Controlling the Camera via Wi-Fi⋗
You can connect the camera to a smartphone as you would connect it to a computer or other device. Multiple smartphones can be added.
Caution
For convenience in this article, iPhones and tablets (iPad) are collectively referred to as "smartphones".
Before connecting to the camera, you must install the free dedicated Camera Connect app on the smartphone.
Connections require that a memory card be in the camera.
Privacy settings must be configured in advance to allow image viewing on the smartphone.
Movie shooting is not available.
Keep the camera still by mounting it on a tripod or taking other measures.
Caution
In the following explanation, smartphone setting procedures are indicated by the

icon, and camera setting procedures are indicated by the

icon.
Do not cover the Wi-Fi antenna area with your hands or other objects. Covering the antenna may decrease the speed of image transfers.
On the screen, wireless signal strength is indicated by the following icons :
- [  ] : high ] , [
  : medium ] , [
  : low ] , [
  : weak ]
Step 1-A : Connect via Bluetooth
1-A-1. Confirm the smartphone's settings.
Make sure that [Airplane mode] is not set.
Touch [Wi-Fi].
Set the [Bluetooth] switch to [ON].
Caution
Please refer to the related information for details on the smartphones which can be connected with a camera wirelessly.
1-A-2. Download Camera Connect from the App Store and install it on the smartphone.
Caution
The Camera Connect application is free, but separate connection charges for accessing the App Store may be applicable.
An Apple account is necessary to download Camera Connect.
Downloading the application via a cellular network may take longer than downloading via Wi-Fi.
The home screen will reappear when the installation of Camera Connect is complete.
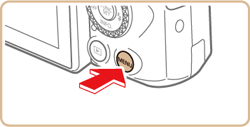
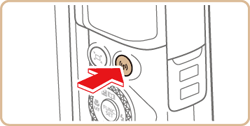
1-A-3. Press the power button.
1-A-7. To return to [Wireless settings] after pressing the [MENU] button, press the [MENU] button again.
1-A-9. A screen is displayed indicating that the camera is waiting to connect.
1-A-11. After the camera is recognized, a camera selection screen is displayed.
Select the camera to connect to.

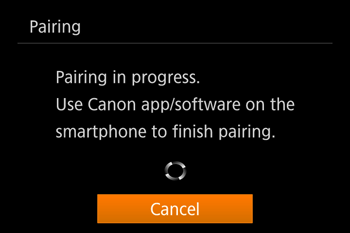
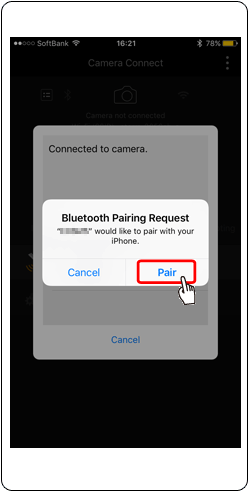
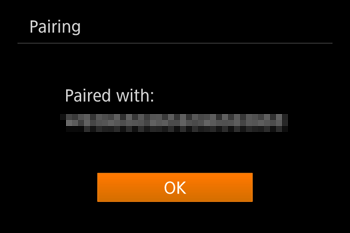
1-A-12. Touch [pair].
1-A-14. Press the [  ] button when the screen at left is displayed.
Caution
Battery life may be shorter when you use the camera after pairing, because power is consumed even when the camera is off.
Before bringing the camera to places where the use of electronic devices is restricted, set [Bluetooth] to [Off], to avoid having the camera ready for Bluetooth communication even when it is off.
These steps show how to use the camera as an access point, but you can also use an existing access point.
1-B-1. Confirm the smartphone's settings.
Make sure that [Airplane mode] is not set.
Set the [Wi-Fi] switch to [ON].
Caution
Please refer to the related information for details on the smartphones which can be connected with a camera wirelessly.
1-B-2. Download Camera Connect from the App Store and install it on the smartphone.
Caution
The Camera Connect application is free, but separate connection charges for accessing the App Store may be applicable.
An Apple account is necessary to download Camera Connect.
Downloading the application via a cellular network may take longer than downloading via Wi-Fi.
The home screen will reappear when the installation of Camera Connect is complete.
1-B-3. Press the power button.
1-B-4. Press the [  ] button,
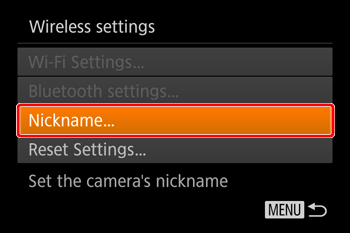
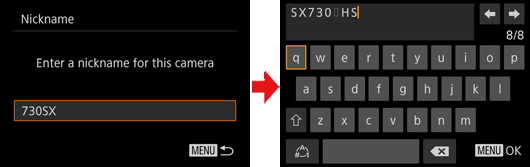
•For more information on using the keyboard, please refer to "Using the On-Screen Keyboard".
Caution
If the [Device Nickname] screen is displayed, press the [
] button.
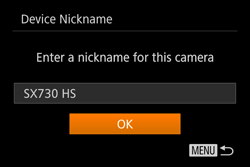
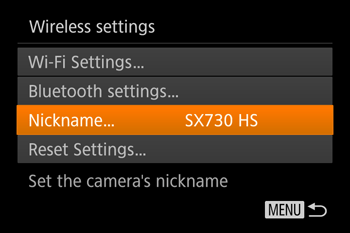
This nickname will be displayed on [Select a Device] screen when connecting to other devices via Wi-Fi.
To change the camera’s nickname, press the [

] , [

] buttons to choose the [Nickname] field, press the [
] button to display the keyboard, and then enter the desired nickname. After you have finished entering the nickname, press the [MENU] button to return to the registration screen, press the [
] button, choose [OK], and then press the [
] button.
1-B-6. Press the [ ] , [ ] buttons to choose [Add a device], and then press the [ ] button.
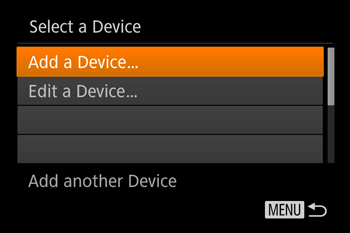
Caution
Once you have connected to devices via the Wi-Fi menu, recent destinations will be listed first when you access the Wi-Fi menu. You can easily connect again by pressing the [
] , [
] buttons to choose the device and then pressing the [
] button. To add a new device, display the device selection screen by pressing the [

] , [

] buttons, and then configure the setting.
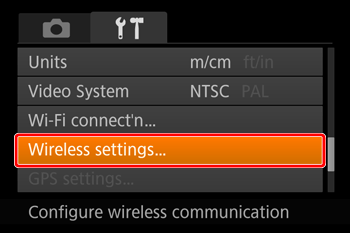
If you prefer not to display recent target devices, choose MENU -⋗ [

] tab -⋗ [Wireless settings] -⋗ [Wi-Fi Settings] -⋗ [Target History] -⋗ [Off].
1-B-7. The camera's SSID and password are displayed.
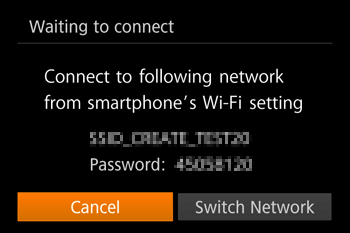
1-B-8. Wi-Fi setting menu, choose the SSID (network name) displayed on the camera to establish a connection.
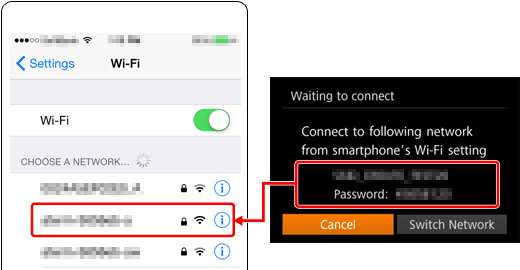
In the password field, enter the password displayed on the camera.
Caution
To connect without entering a password in step 8, choose MENU -⋗ [
] tab -⋗ [Wireless settings] -⋗ [Wi-Fi Settings] -⋗ [Password] -⋗ [Off]. [Password] is no longer displayed on the SSID screen (in step 7).
Make sure that the camera and the smartphone are connected and then touch the home button to return to the home screen.
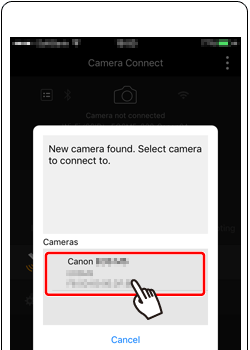
1-B-10. On the camera selection screen displayed on the smartphone, choose the camera to begin pairing.
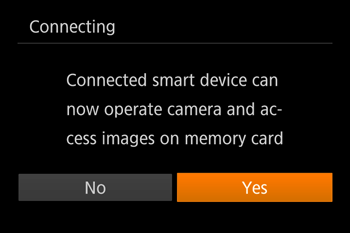
1-B-11. Adjust the privacy setting.
Press the [
] , [
] buttons to select [Yes], and then press the [
] button.
Caution
You can now use the smartphone for remote live view shooting, or to browse or transfer images on the camera.
Once you have registered a smartphone, you can change privacy settings for it on the camera.
1-B-12. The following screen is displayed when the connection with the smartphone is established.

Step 2-A : Controlling the Camera via Bluetooth
2-A-1. On the smartphone, select [Bluetooth remote controller] from the Camera Connect menu screen.

Caution
[Bluetooth remote controller] is not available when connected via Wi-Fi.
Set the shooting mode and the shooting functions on the camera.
Caution
Bluetooth connection status is indicated by one of the following icons (

).
- [  : Connected ] , [
  : Disconnected ]
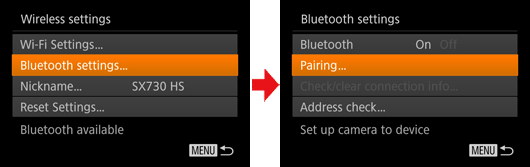
To check the information of the smartphone connected via Bluetooth in [Check/clear connection info], choose MENU -⋗ [
] tab -⋗ [Wireless settings] -⋗ [Bluetooth settings]. Choose [Address check] to check the camera's Bluetooth address.
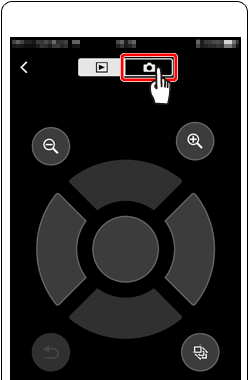
2-A-2. The smartphone screen changes to a screen for remote control via Bluetooth.
Choose [

].
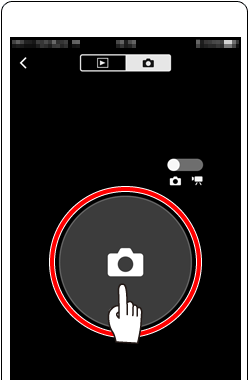
2-A-3. Use the smartphone to shoot in Shooting mode.
Touch [
].
Step 2-B : Controlling the Camera via Wi-Fi
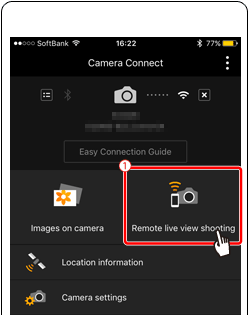
2-B-1. On the smartphone, select [Remote live view shooting] from the Camera Connect menu screen.
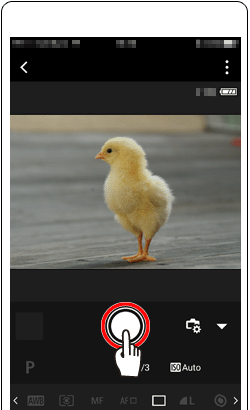
2-B-2. Once the camera is ready for remote live view shooting, a live image from the camera is displayed on the smartphone.
Use the smartphone to shoot, Touch [

].
Caution
At this time, a message is displayed on the camera, and all operations except pressing the power button are disabled.
Caution
Focusing may take longer.
Image display or shutter release may be delayed, depending on the connection status.
Any rough subject motion shown on the smartphone due to the connection environment will not affect recorded images.
Captured images are not transferred to the smartphone. Use the smartphone to browse and transfer images from the camera.
Using the On-Screen Keyboard
Use the on-screen keyboard to enter information, Wi-Fi connections, and so on.

Entering Characters
- Press the[ ] [ ] [ ] [ ] buttons to choose a key labeled with a character, and then press the [ ] button repeatedly to enter the character you want.
Moving the Cursor
- Choose [  ] or [
  ] and press the [ ] button.
Entering Line Breaks
- Choose [  ] and press the [ ] button.
Switching Input Modes
- To switch to other kinds of characters (such as numbers or symbols) on this screen, choose  and press the [ ] button.
- To enter uppercase letters, choose [  ] and press the [ ] button.
- Available input modes vary depending on the function you are using.
Deleting Characters
- Choose [  ] and press the [ ] button. The previous character will be deleted.
- Choosing [ ] and holding down the [ ] button will delete five characters at a time.
Returning to the Previous Screen
- Press the [MENU] button.