Canon Group
Close Close
Menu Menu Close Close Search
Canon PIXMA PRO-1 printer
PIXMA PRO-1 Support
FAQs & troubleshooting

No Printing Results/Printing Is Blurred/Colors Are Wrong/White Streaks

Content Id: 8201086800


Issue

Cause and solution

Check 1: Print the Nozzle Check Pattern and perform any necessary maintenance operations such as Print Head Cleaning.

Print the Nozzle Check Pattern to determine whether the ink ejects properly from the print head nozzles.

Refer to [ Printing the Nozzle Check Pattern ] [ Cleaning the Print Head ] [ Cleaning the Print Head Deeply ] [ Perform System Cleaning ]

If the Nozzle Check Pattern is not printed correctly:

Check to see if a particular color's ink tank is not empty.

If the Nozzle Check Pattern is not printed correctly though ink is sufficient, perform the Print Head Cleaning and try printing the Nozzle Check Pattern again.

If the problem is not resolved after performing the Print Head Cleaning twice:

Perform the Print Head Deep Cleaning.

If the problem is not resolved after performing the Print Head Deep Cleaning:

Perform the System Cleaning manually.

If the problem is not resolved after performing the System Cleaning manually, perform the Print Head Deep Cleaning after 24 hours. If the problem is not resolved yet, the Print Head may be damaged. Contact the service center.

Cause and solution

Check 2: Did you confirm the paper and print quality settings?

Cause and solution

Check 3: Check the status of ink tanks. Replace the ink tank if the ink has run out.

When you need to replace ink tanks, follow the procedure below.

Caution

If you remove an ink tank, replace it immediately. Do not leave the printer with ink tanks removed.
Use new ink tanks for replacement. Installing used ink tanks may cause the nozzles to clog. Furthermore, with such ink tanks, the printer will not be able to inform you when to replace the ink tanks properly.
Once an ink tank has been installed, do not remove it from the printer and leave it out in the open. This will cause the ink tank to dry out, and the printer may not operate properly when it is reinstalled. To maintain optimal printing quality, use an ink tank within six months of first use.

Caution

Color ink may be consumed even when printing a black-and-white document or when black-and-white printing is specified. Every ink is also consumed in the standard cleaning and deep cleaning of the Print Head and in the system cleaning, which may be necessary to maintain the printer's performance. When an ink tank is out of ink, replace it immediately with a new one.

1. Make sure that the power is turned on.

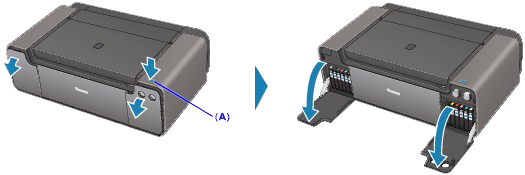
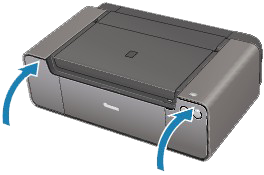
2. Open the Tank Covers.

(1) Press the Tank Cover Open button (A).

The Tank Cover Open button flashes blue, and the left and right Tank Covers start to open.

When the Tank Covers are fully open, the Tank Cover Open button changes to a slower flash.

Caution

Be sure to press the Tank Cover Open button to open the Tank Covers. Do not force open the Tank Covers by hand. Doing so may damage the printer.
Do not place anything in front of the Tank Covers. If the Tank Covers do not fully open, the Alarm lamp flashes and the Tank Cover Open button goes off.

Caution

The Tank Cover Open button is not lit during normal operation. It lights up blue when an error or caution that requires checking the ink tank status occurs. In either case, you can open the Tank Covers by pressing the Tank Cover Open button.
Be sure to close the Top Cover when opening the Tank Covers. Otherwise, the Tank Covers will not open even if you press the Tank Cover Open button.
The time it takes for the Tank Covers to open after pressing the Tank Cover Open button depends on the printer status. It normally takes about 5 seconds to 1 minute.

3. Remove the ink tank with the lamp flashing fast.

The procedure for replacing the Cyan ( ) ink tank is shown here.

Push the Ink Tank Eject button and remove the ink tank.

Caution

Handle the ink tank carefully to avoid staining of clothing or the surrounding area.
Discard the empty ink tank according to the local laws and regulations regarding disposal of consumables.

Caution

Do not remove two or more ink tanks at the same time. Be sure to replace ink tanks one by one when replacing two or more ink tanks.
For details on ink lamp flashing speed, see [ Checking the Ink Status ].

4. Prepare the new ink tank.

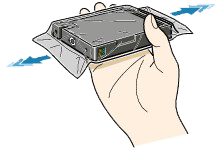
(1) Before removing the ink tank from its package, shake it five to six times horizontally.

Caution

Handle the ink tanks carefully. Do not drop or apply excessive pressure to them.

(2) Remove the ink tank from the package.
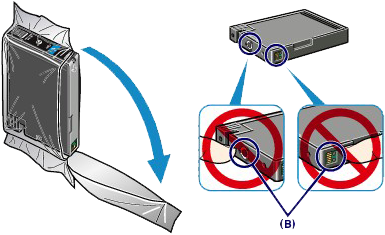
Caution

Do not touch the contacts (B) of the ink tank.

5. Install the new ink tank.

(1) Insert the new ink tank into its position.

Insert the ink tank into its position below its color on the label.

(2) Press the mark (Push) to set the ink tank firmly into place.

When the installation is completed properly, the ink lamp lights red.

Caution

An ink tank cannot be inserted into the wrong position. Be sure to install an ink tank in its correct position below its color on the label.
You cannot print unless all the ink tanks are installed. Be sure to install all the ink tanks.
Once an ink tank is installed, do not remove it until the next replacement. If you remove an ink tank with enough ink, ink may spill out of it.

6. Close the Tank Covers.

Close the left and right Tank Covers until they click.

After ink tank replacement, the printer starts mixing the ink automatically and the Tank Cover Open button flashes blue. The printer vibrates during mixing. Wait until the Tank Cover Open button goes off and the printer has stopped making operating noise. This takes about 1 minute.

Caution

If the Tank Cover Open button still flashes, make sure that the left and right Tank Covers are closed properly.
If the Alarm lamp still flashes orange after the Tank Covers are closed, refer to [ Alarm Lamp Flashes Orange ].
If printed ruled lines are misaligned or the print head position is misaligned, adjust the print head position.

See [ Aligning the Print Head ]

Replacing an Ink Tank

Cause and solution

Check 4: When using paper with one printable surface, make sure that the paper is loaded with the printable side facing up

Printing on the wrong side of such paper may cause unclear prints or prints with reduced quality.

Refer to the instruction manual supplied with the paper for detailed information on the printable side.

Cause and solution

Check 5: Make sure that the input profile in the printer driver is set correctly (Windows)

If printout color of photographs that are taken in Adobe RGB mode is not satisfactory, configure the input profile and then try printing again. It may improve the quality of printout color.

1. Open the printer driver setup window.

2. On the Main sheet, select Manual for Color/Intensity, and then click Set.

3. On the Matching sheet, select ICM for Color Correction.

4. Select Adobe RGB (1998) for Input Profile.

"Was this helpful?"