

Solution
Creative Filter CharacteristicsApplying a creative filter when shooting
Applying Creative filter processing to images that have already been shot
Except in the Scene Intelligent Auto, Handheld Night Scene, HDR Backlight Control, and Movie shooting modes, you can apply a Creative filter and check the effect and composition. When you take the picture, only the image applied with the Creative filter will be saved. If you want to also save the image not applied with the Creative filter, use the Creative filter during image playback
Creative Filter Characteristics
| Grainy B/W | Makes the image grainy and black and white. By adjusting the contrast, you can change the black-and-white effect. |
| Soft focus | Gives the image a soft look. By adjusting the blur, you can change the degree of softness. |
| Fish-eye effect | Gives the effect of a fish-eye lens. The image will have a barrel-type distortion. Depending on the level of this filter effect, the area trimmed along the periphery of the image changes. Also, since this filter effect will magnify the image center, the apparent resolution at the center may degrade depending on the number of recorded pixels. Set the filter effect while checking the resulting image. With the fish-eye effect, the AF will be fixed at the center AF point. |
| Art bold effect | Makes the photo look like an oil painting and the subject look threedimensional. You can adjust the contrast and saturation. Note that the sky, white walls, and similar subjects may not be rendered with a smooth gradation and may look irregular or have significant noise. |
| Water painting effect | Makes the photo look like a watercolor painting with soft colors. You can adjust the color density. Note that night scenes or dark scenes may not be rendered with a smooth gradation and may look irregular or have significant noise. |
| Toy camera effect | Gives a color cast typical of toy cameras and darkens the image's four corners. By adjusting the color tone, you can change the color cast. |
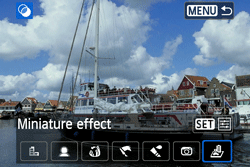
| Miniature effect | Creates a diorama effect. You can change where the image looks sharp. |
Caution
 ⋗ button to check the soft focus of the image that will be recorded.
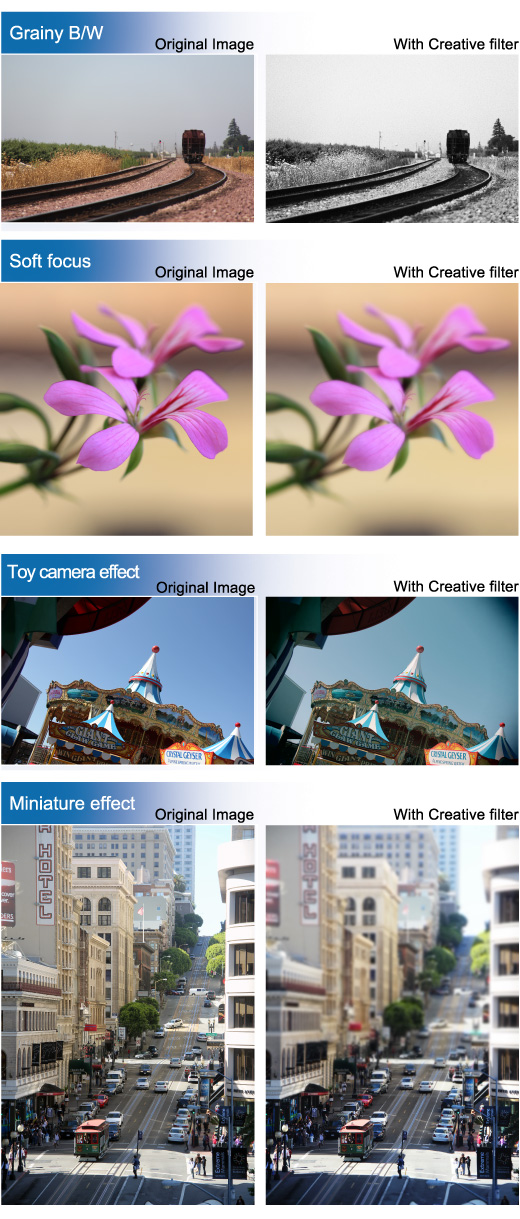
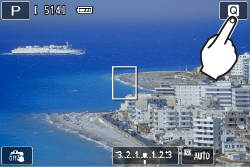
Applying a creative filter when shooting
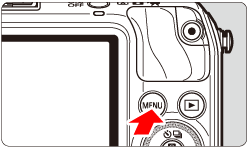
1. Set the Power to ⋖ON⋗.
Select a shooting mode other than ⋖ 


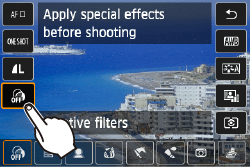
2. Press the ⋖
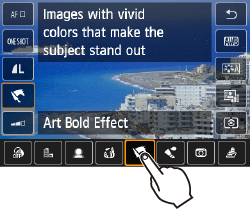
3. Tap [Creative filters], and then tap the desired filter.
On the LCD monitor, you can see the effect of the Creative filter you selected.
4. Adjust the filter effect.
 ] (except for Toy camera) or [
  ] (Toy camera) indicator will appear. While checking the effect on the LCD monitor, tap [
  ] or [
  ].
]. ] to turn off the Quick Control screen. A white frame will appear, indicating the area that you want to look sharp. While looking at the LCD monitor, drag the frame as desired. ], you can change the white frame's horizontal or vertical orientation.
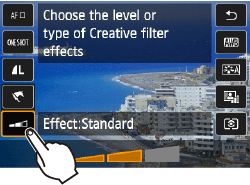
5. Press the shutter button to shoot.
Caution
When you use a Creative Filter and shoot, even if you set the drive mode to continuous shooting ( 

Caution
 +
+  or . A Creative filter also cannot be applied if AEB (Auto Exposure Bracketing) or WBB (White Balance Bracketing) is set or if [High ISO speed NR] is set to [Multi Shot Noise Reduction].
Applying Creative filter processing to images that have already been shot
You can apply Creative filters even during image playback. An image applied with a Creative filter during playback can be saved as a new image, leaving the original image intact.
You can use the same Creative filters that are available during shooting.
1. Set the power to ⋖ON⋗.
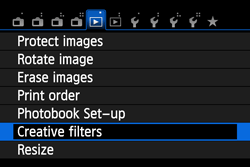
2. Press the ⋖MENU⋗ button to display the menu.
3. Under the [ 
The images will be displayed.
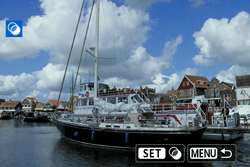
4. Select the image you want to apply a filter to.
You can also select an image on the index display.
5. When you press ⋖
/SET⋗.6. Press the ⋖Main Dial⋗ to adjust the filter effect, then press ⋖
For the Miniature effect, press the ⋖Main Dial⋗ button and select the image area (within the white frame) where you want the image to look sharp. Then press ⋖

7. Select [OK] to save the image.

8. Press the ⋖MENU⋗ button to return to the menu.
Caution
When shooting
image will be saved in the aspect ratio that was set.