


Solution
Checking the printer environmentPreparing the items required
Setting up the printer
Printing from the Cloud
Using the Cloud functionality of the printer, you can print data that is uploaded to the Cloud services (such as Canon iMAGE GATEWAY and Evernote).
For Cloud printing from a smartphone or tablet device, follow the procedures explained below.

Checking the printer environment
To use the Cloud, the printer needs the following environment.
If the printer is connected to a PC only via a USB cable, the Cloud cannot be used.
Caution
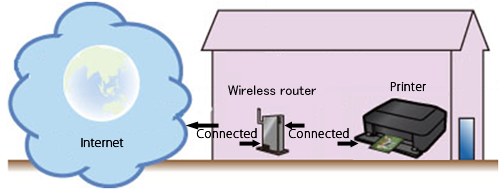
The printer connects to a wireless router which is itself connected to the Internet, as shown in the diagram.
If the printer and wireless router are not connected, refer to [ How to connect the printer and router via wireless LAN ] and connect the printer to the wireless router.
* To use those services on the intranet, open Port 5222 (both on the PCs and the intranet).
Preparing the items required
For Cloud printing from a smartphone, tablet device, or other types of PDA, you need to register the printer to Canon Inkjet Cloud Printing Center.
Prepare the following:
a) Your e-mail address
Your e-mail address will be used for the account information to log in to Canon Inkjet Cloud Printing Center.
b) Smartphone, tablet device, or other types of PDA
Using a smartphone, tablet device, or other types of PDA, you will register the printer to Canon Inkjet Cloud Printing Center.
Caution
The smartphone, tablet device, or other types of PDA must be connected to the Internet (including via the 3G line).
Setting up the printer
Register your printer to Canon Inkjet Cloud Printing Center in three steps below.
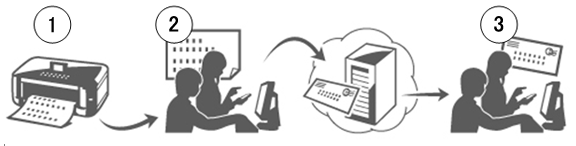
Step 1: Print the printer registration ID and URL.
Step 2: Visit the printed URL, and enter your account information (your e-mail address, etc.).
Step 3: You will receive the e-mail to the entered address. Visit the URL given in the received mail, and register your printer.
Step 1: Print the printer registration ID and URL.
(1) Power on the printer.
(2) In the HOME menu of the printer, select [ Setup ].
(3) Select [ Web service setup ] and press [ OK ].
(4) Select [ Connection setup ] and press [ OK ].
(5) Select [ IJCloudPrintingCtr ] and press [ OK ].
(6) Select [ Register w/ service ] and press [ OK ].
(7) At the following message, select [ Yes ] and press [ OK ].
(8) At the message for selecting the language for printing, select a desired language.
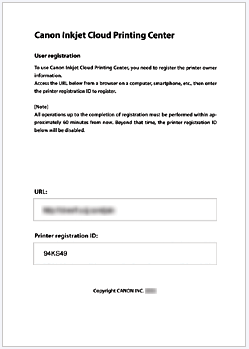
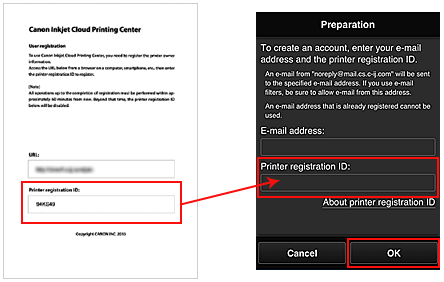
(9) Follow the instructions displayed in the window, and print the URL of the authentication site and the Printer registration ID
Set A4 size or Letter size plain paper and select [ OK ].
The authentication URL and printer registration ID will be printed.
Caution
The printout will be used in the later process of registration.
Caution
Step 2: Visit the printed URL, and enter your account information (your e-mail address, etc.).
Caution
(1) Use the web browser on your PC, smartphone, tablet, or other devices to access the authentication URL.
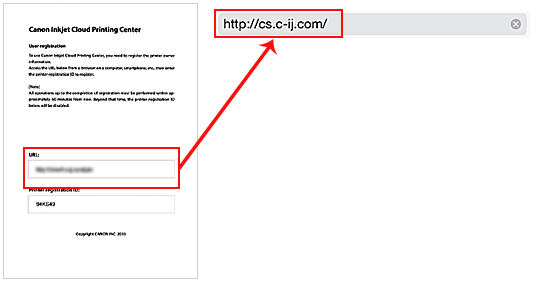
(2) When the printer registration screen is displayed, select [ Create new account ].
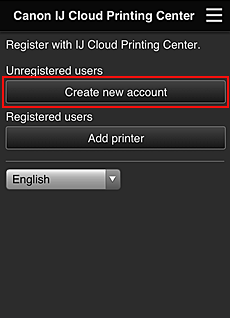
(3) Enter the E-mail address and Printer registration ID of the printer's owner, and then select [ OK ].
The registration page URL is sent to the e-mail address entered.
Caution
- Up to 255 characters consisting of single-byte alphanumeric characters and symbols (!$'*/^_{}|~.-@). (Uppercase and lowercase letters are differentiated.)
- Multibyte characters cannot be used.
You will get an error if the e-mail address you enter contains a character that cannot be used.
There will be no error display even if you could not receive the e-mail because of the spam filter setting or if you entered an incorrect e-mail address.
Step 3: Visit the URL given in the received mail and complete the registration.
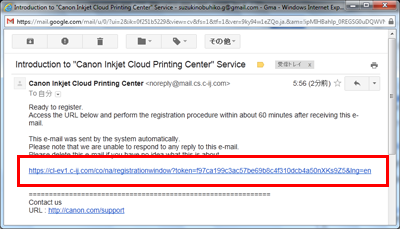
(1) The mail shown below will be sent to your e-mail address you entered in Step 2. Click on the given URL.
Caution
Depending on your mailer settings, the received mail may be automatically sorted into a box other than your inbox.
If the mail is not found in your inbox, check the other boxes.
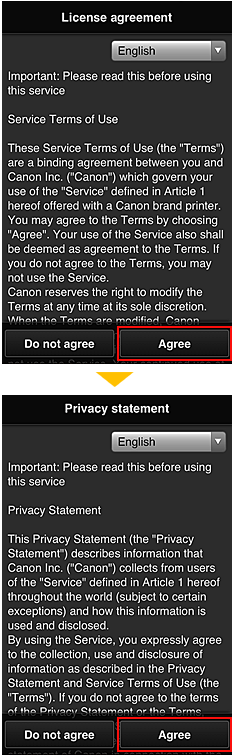
(2) In the License agreement and Privacy statement windows of Canon Inkjet Cloud Printing Center, read the statements, and select [ Agree ] if you agree.
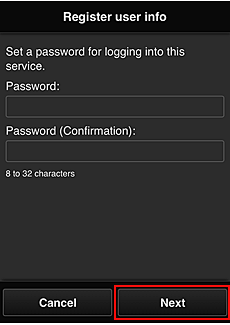
(3) In the user information entry screen, enter your [ Password ], and select [ Next ].
Enter your password for logging in to the Canon Inkjet Cloud Printing Center.
Caution
- The password must be between 8 and 32 characters long, using single-byte alphanumeric characters and symbols (!"#$%&'()*+,-./:;⋖=⋗?@[\]^_`{|}~). (Alphabets are case-sensitive)
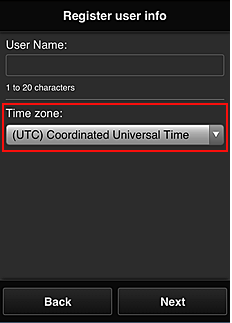
(4) Enter the [ User name ].
Enter the name that identifies the user.

Caution
- The user name must be between 1 and 20 characters long, using single-byte alphanumeric characters and symbols (!"#$%&'()*+,-./:;⋖=⋗?@[\]^_`{|}~). (Alphabets are case-sensitive)
(5) Specify the [ Time zone ] setting, and select [ Next ].
Select your region on the list. If you cannot find your region on the list, select the one closest to your region.
[ Apply daylight saving time ]
This appears only when there is a daylight saving time in the [ Time zone ] that you selected.
Select whether or not to apply the daylight saving time.
(6) Enter the [ Security code ] and select [ Done ].
Enter the code for authenticating the user.

Caution
- Up to 8 single-byte numbers
(7) The registration is complete. A registration completion message is displayed.
Select [ OK ], and you will see the login screen.
To perform Cloud printing, log in to Canon Inkjet Cloud Printing Center by entering the e-mail address and password that you registered.
Printing from the Cloud
Visit and log in to Canon Inkjet Cloud Printing Center (http://cs.c-ij.com/) from your smartphone, tablet device, or other types of PDA, and select the application software. Then, perform printing.
Caution